Need a terrain for your upcoming game or Hollywood blockbuster? Or are you simply looking to master the art of creating landscapes and planes that can be used for hosting other elemental objects? Either way, and for so many others, you can do so with AutoCAD.
Although there are other tools (Civil, Map, 3D Maya, Unity just to name a few of the popular ones) that would do this one specific job far better than AutoCAD, doing this in AutoCAD has more than just the following advantages:
- DWG/DXF are native formats for AutoCAD
- These formats are used by every other CAD package
- AutoCAD allows you flexibility and functionality for any kind of modeling project
Just the fact that almost every CAD package makes use of the formats means knowing how to create terrain objects in AutoCAD will not only come in handy, but may be your only hope when limited by choice in packages. Read on to see how to create terrain objects solely in AutoCAD as well as how to do the same with the help of other packages.

Terrain Objects in AutoCAD
 When creating such objects in AutoCAD alone, you’re going to need some know-how about polyline contours and elevation properties. Read on for the step by step guide.
- Create a plan for the area that you need to create a terrain from.
- Set the elevation of all polyline contours as desired.
- Select one of the contours, and from the context menu (right-click) select “Select Similar”.
- From the tools up top, select the “Drape” tool.
- This will apply the drape command to the selected polylines.
And the following commands/options will need to your input:
Command/Option |
Result |
| Erase selected contour | No |
| Generate regular mesh | Yes |
| Select regular mesh corner | Select one edge of your model |
| Select opposite Mesh Corner | Select the diagonally opposite edge |
| Mesh subdivision along X direction | Press Enter to accept default value |
| Mesh subdivision along Y direction | Press Enter to accept default value |
| Erase base thickness | Specify a value according to your requirements |
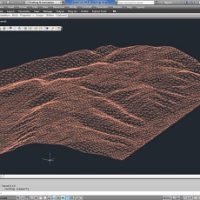
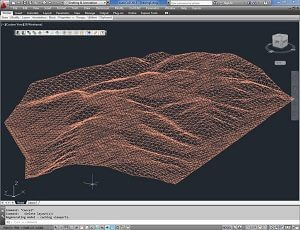
This will apply the derived topography to your model. Select a viewpoint to use as the default. From the “View” tab, select “Realistic” visual style. This will finalize the whole model and show you the final terrain map.
That’s it?
As far as AutoCAD is concerned, yes, you’ve just created your very own terrain. Since AutoCAD is meant primarily for 2D plans and designs, there isn’t a lot that you can do from this point forward with AutoCAD but the resulting terrain that you’ve just created can be of a lot of use when exported into the right package. For example, the terrain that you’ve created could be of a real estate site or a site reserved for the next Baseball stadium. Depending on your requirements, this terrain or any other terrain object developed in AutoCAD can be exported forward. In the next section, we’re going to look at how to work further with such a drawing after exporting it to 3D Studio Max.
3D Studio Max
 With 3D Studio Max, you can do a lot of 3D designing but the contour data or terrain settings still come from a 2D plan or reference. You can use Google’s API’s (PlexEarth) or other sources of PointCloud data to generate the terrain otherwise if you want to draw a custom terrain then go for the import option, where you import a plan created initially in AutoCAD.
There is another advantage to using AutoCAD for your terrain data and that is the fact that since the contours in the AutoCAD drawing will probably be on a single layer (they should be if they’re not), when imported into 3D Studio, all those contours will become a single 3D object. Selecting one of the contours, selects all of them, since all of the contours are now basically just one contour. Upon selection, the bounding box will box the whole drawing meaning the whole terrain is one 3D object, simply because of the import.
Now, with the bounding box in place, which means your object is selected, click the “Create” (![]() ) tab. From the options, choose the Geometry (
) tab. From the options, choose the Geometry (![]() ) button. From the drop-down list beneath, select “AEC Extended”. For your know-how, AEC stands for “Architecture, Engineering and Construction” and allows objects to be created with properties that make them optimal for such renderings. Beneath it, click the “Terrain” button. (Note: In the case the button is disabled, you didn’t select the object to begin with). Once clicked, wait patiently for your new terrain object. Yes, that’s literally it. You have created a fully developed terrain object.
) button. From the drop-down list beneath, select “AEC Extended”. For your know-how, AEC stands for “Architecture, Engineering and Construction” and allows objects to be created with properties that make them optimal for such renderings. Beneath it, click the “Terrain” button. (Note: In the case the button is disabled, you didn’t select the object to begin with). Once clicked, wait patiently for your new terrain object. Yes, that’s literally it. You have created a fully developed terrain object.
Conclusion
Whether you’re working on a project out of professional liabilities or whether you’re working on it just to pass some time, the integration of more than a single CAD package, involvement of add-ins and plug-ins are all essential to creating even the easiest of designs and models. Hence an in-depth knowledge of technique is the first step, an understanding of the toolkit is second and dedication that leads to hours of practice is last, but certainly not the least.