AutoCAD has the tools necessary for preparing presentations, image inclusive slides and other scripted hacks that can add so much more interactivity to your models and drawings. But with all that vastness, AutoCAD by itself has no methods, tools or functions for the development of animations, especially ones that be extended into walkthroughs. Yes, that’s right, you can’t create walkthroughs solely with AutoCAD. What you can do, is use the AutoCAD drawings with animation-specific software such as 3D Studio Max and the like. Another option is to use Revit LT, an Autodesk product meant specifically for construction, structural engineering and so on. Because of its nature, Revit LT can be used to create walkthroughs and pretty cool ones too.
Since using Revit LT is the easier way out, let’s talk about it first. The second section will talk about 3D Studio Max. For both sections, we’re going to assume that the model is complete and no further drawing/modelling needs to be committed. Read on for how to create walkthroughs.
A Little Background First
Walkthroughs are essentially a recording of the cameras movement according to a path that you have specified. The final animation is a complete and rendered sequence that allows the user to feel as if they are walking through the virtual representation of the model. Having this concept at hand, let’s talk about the how-to.
Revit LT
When using Revit LT, we’re going to assume that you have already imported your model from AutoCAD, and you’re ready to go.
- Select the plane/face/view that you want to create the walkthrough in. The popular and standard choice is the plan view, even though 3D, elevation and sectional views are also available options.
- Go into the View menu and from the Create option choose 3D View. From the sub-menu choose the Walkthrough option (highlighted with the two feet icon
 ).
). - In the following windows –
- Select an offset value that will adjust the camera from its default position. This will be available if your view is the “Plan” view.
- For other views, the “Options” tab will allow you to configure options that can affect the visual output. From here you can make your walkthrough appear panoramic, orthographic or otherwise.
- Having selected all the options, go into the design view, and select a point to position your key frame. From this point, draw the first straight (or curved) path that you would like for the camera to follow.
- Place as many key frames you want, where ever you like. Once complete, double click to end the path. Press the “Finish Walkthrough” button and press “Esc” for a final commit.
- As soon as you do this, Revit LT will develop a walkthrough of your desired settings and paths and save it in the projects explorer under a count-enabled label such as “Walkthrough 1” or “Walkthrough Default”.
And there you have it, the easy way of creating walkthroughs with Revit LT. For those of you who are wondering, yes this is the “right” and “valid” way of creating a walkthrough, for the most part. And that last comment was meant to highlight the fact that even though Revit LT lets you create walkthroughs, 3D Studio Max is the tool dedicated to animations and animatronics, and hence the following method is the one you want to follow if you have the resources and time to create a Hollywood-grade, feature-film-CGI-level walkthrough. For that, read on.
3D Studio Max
No chit chat here, let’s dive straight into it.
- Import the AutoCAD drawings into 3D Studio Max.
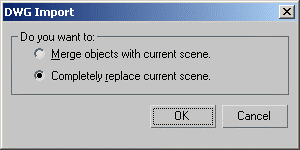
- If you have elements in Max with which you may want to merge the import file, select the merge option. Otherwise, select the option that offers to replace the current elements in the scene. Check out the screenshot here:

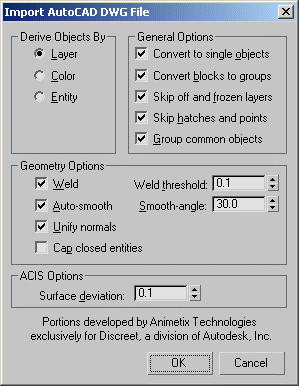
Import Type Window - Choose the options from the following “Import AutoCAD DWG File” option according to your requirements and press “OK”.

Import Options
Note: All drawings require some time to load. Simple drawings may come up in under a minute, depending obviously upon available resources, complex drawings will take longer. At this point, wait for the whole model to load before moving on.
The following process has 5 parts. These five parts are discussed below and will allow you to complete a walkthrough.
Creating The Walkthrough in AutoCAD
1. Draw The Path For The Walkthrough
Using the “Create” tab, choose the “Shapes” option and select line. With the “Line” tool you can create a line that you can assign to the camera and that will become the path. That’s literally it when it comes to creating a path for the walkthrough, but other options deserve mention.
Since a camera would have to move swiftly when turning to the side on a sharp curve, the path should be smooth. Camera movements on a sharp path can be timed (Time configuration – step 3) for a smoother flow, but instead of having to do that for every corner, the “Creation Method” option will let you choose “Smooth” as your drawing method helping your path creation by smoothing out sharper edges. This option can be accessed from the command prompt.
Offset options from the “Transform” option within the “Tools” menu will allow to set the camera’s height since having drawn the line will by default be grounded.
2. Adding A Camera(s)
From the “Create” tab choose the “Camera” option. The control panel will change to provide the appropriate options. Within the control panel, you will see the “Object Type” option that will allow you to select a camera that can either be free or targeted. The free camera will be free and will allow you complete flexibility and control over its working. A targeted camera is meant to view the area around a single point, the point being the target. Choose a free camera as that will allow you all the flexibility that you may need.
Lens options will allow you a range of viewing standards. 50mm lens are the “human-eye” view with a smaller lens constricting the viewing angle and vice versa.
3. Timing And Frame Rates
You may be wondering, whether you missed a part (or we did when posting this article) about adding the camera to the path. That comes next. The reason is that the camera’s configuration must be finalized before we commit it to the path.
For the timing of the camera’s movements, you need the “Time Configuration” button, which is available for each camera object that you’ve added. Let’s talk a bit about how the timing information is processed. Basically, the frame rate and the number of frames come together to conclude the total length of the animation. In simple words –
Length in seconds = Total number of frames / frames per second
Select the timing information that you want, an FPS of 15 is adequate for computer animations.
4. Assigning The Camera To The Path
a) Select the camera and from its command prompt select the “Motion” tab ![]() .
.
b) To position the camera, go into the “Assign Controller” option and select the “Position” labelled option. This is how you will position the camera for its initiation.
c) Select the “Assign Controller” button ![]() which will have become active only once you selected the “Position” option. Clicking this button will enable you to access an “Assign Position Controller” window from which you must select “Path Constraint”.
which will have become active only once you selected the “Position” option. Clicking this button will enable you to access an “Assign Position Controller” window from which you must select “Path Constraint”.
d) After you click “OK”, use the “Add Path” button on the next dialogue box and select the line/path you drew before.
e) Check the “Follow” option below. Click “OK”.
5. Rendering The Animation
Previewing the animation, modifying the path and camera properties, adding other elements are all activities that you can perform before this step. We’ll leave them out because they are not part of the process instead are meta-tasks that will need addressing based on your requirements and previous settings.
To render the whole walkthrough, you can select the “Render Scene” option (![]() ) from the main toolbar. This will open up the settings page. Choose your rendering preferences and hit “Render”.
) from the main toolbar. This will open up the settings page. Choose your rendering preferences and hit “Render”.
In The End
Voila, you are all done. This is the whole process of creating a walkthrough with AutoCAD drawn models followed by importing them into 3D Studio Max. Any details that may have not come out the way you wanted, will probably be solely because of the options you selected. The process of creating the walkthrough remains the same. As with any job, practice makes perfect and a lot of it will go into selecting different settings and seeing the output to make sure it’s up to the mark. With that, happy walkthroughing.


Leave a Reply