
Today, we are going a little banana, but don’t be put off, if you were here since Day #1 you actually possess all the skill to come out of this exercise successfully. Here is a simple 2D exercise that I will want us to work on in today’s session.
As an advice, you should always before putting yourself to work with this sort of AutoCAD exercise, try finding what will be easy to start with. I will suggest in this exercise to start by putting those two giant circles in place. You actually have all the information to start drawing them without any hassle.

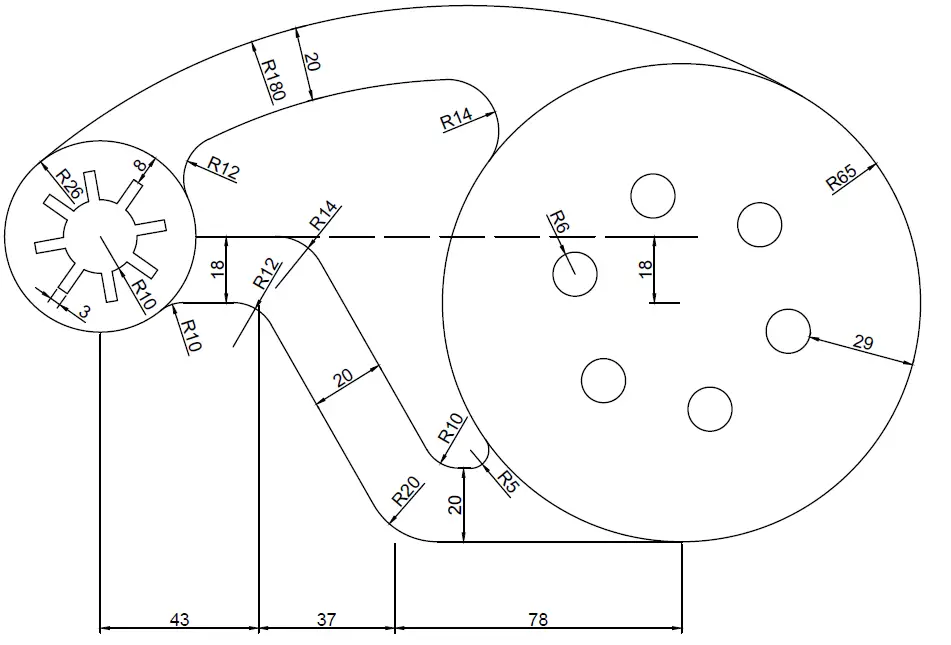
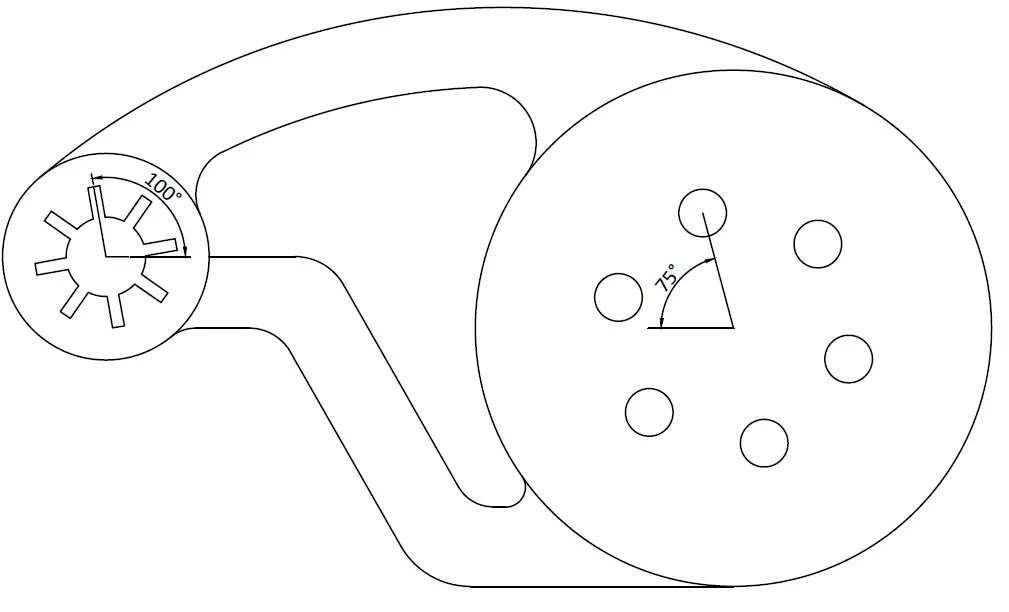
Other information I would like to provide in this exercise are the following. You will need the ARRAY command in AutoCAD to place those object the way they are in this exercise. And to construct an Array, you need a reference object, and in this exercise the reference object is a bit inclined seeing from the center of the array. Their angle of inclination are provided on the image below.
I think you have all to start, in spite of all the information I just provided I will go ahead I shoot some Hint to help you in this exercise.

You can easily get the arc A using the Tangent feature learned in past AutoCAD exercises. Draw B using the OFFSET command. The same approach applies to FGH.
If you still have some difficulties drawing this, feel free to drop a comment below. Do not forget to share and like if this helped you.
See you on the next session.

[ws_table id=”3″]
Comments
8 responses to “20 Days of 2D AutoCAD exercises #16”
Hello Sir,
Im just wanna ask regarding on exer 16. How do you. I cant figure this out. i used to follow the tip u’ve given but my problem is the arc A and B. I made the two circle first and i used the arc command and its hard to configure the two arc with 180 radius between the two circle. pls Help me to understand this. Thank you
Rashid
You do not need to use the Arc command for these Arcs. You need to use the circle command and the OFFSET command.
For Arc A, Use the feature of the circle that allows you to draw a circle passing by two tangent points, and use the resulting arc with an OFFSET distance of 20 to get the Arc B.
You may need to check how to draw a circle with a given radius and tangent to two objects on https://www.computeraideddesignguide.com/drawing-a-circle-in-autocad/
Can’t you just fillet between the offset arc and the 2 circles Instead of tan tan radius to get the desired arcs between the offset arc and the 2 circles?
NO. How would you choose the starting and ending point on the circle then?
Maybe you misunderstood me, I have just tried what I thought might work and it did, what I did was fillet, using line B as first reference point and then the circle with radius 26 and 65 respectively for the 2nd reference and the arcs were put in, I did both methods on different layers, and then turned them both on to find they had both placed the arcs in the same place one the tan tan radius method had been trimmed.
Alright. That’s great! Make sure to check all dimensions at the end to see if they match ones in this exercise.
Thanks for letting me know.
kimak ko susah alu ya
Hi,
I am having difficulties to place the fillet Radis10 at point F. What am I missing there? Thank you in advance!