
Here is the first exercise of a series of 20 individual 2D exercises for AutoCAD. In this series, I will walk you through exercises with the aim of helping you learn how to draw in 2D using the software AutoCAD.
The learning process will be simple. We start from the end, meaning we will set specific goals and we will find how to use AutoCAD commands to meet such goals.
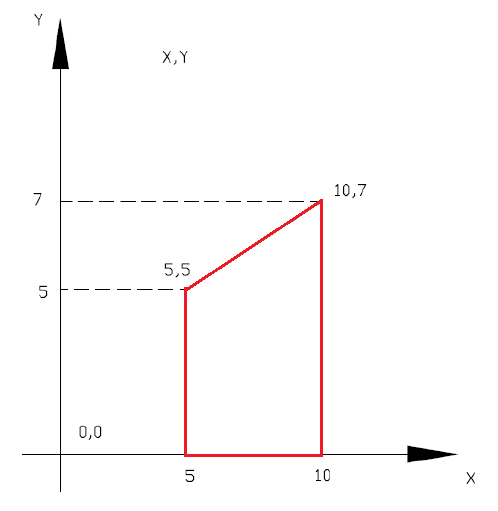
To begin, we will start by trying to draw this simple figure below. Too simple right? The objective here is to learn how to use the command window in AutoCAD in order to draw without using the mouse. This will help us have a first glimpse on how this window works.


We have 4 points and we have the coordinate of each of them. So, basically we have each starting point of our lines and each ending point.
AutoCAD draws lines using coordinates. To better explain, we put our figure in a system of coordinates in the image below in order to improve our understanding. If we consider a coordinate system formed by X, Y, this is how our exercise will fit in the system.
To draw this, open a new file in AutoCAD
- Type “LINE”
- Specify first point: 5,0
- Specify next point or [Undo]: 10,0
- Specify next point or [Undo]: 10,7
- Specify next point or [Close/Undo]: 5,5
- Specify next point or [Close/Undo]: 5,0
- Hit the ENTER once more
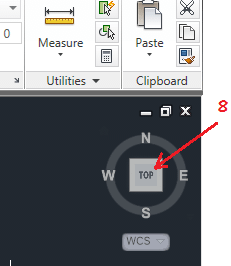
- Click on 8 (look at the figure below)
(The part in bold is what AutoCAD is asking you to enter. You will see those same words displayed in the command windows. You should enter are those coordinates, e.g. 5,0 -> 10,0 -> 10,7 and so on. However, remember after each step you need to validate your action by pressing the ENTER key on your keyboard)
There you go! We are done with creating the figure. You noticed how we are able to draw without using a mouse. It may be difficult for a newcomer but not impossible.
AutoCAD draws lines from one point to the other and starts the next line where the previous one ended. In step 7, we disabled the LINE command and at that step you can also press the ESC key instead of the ENTER key, it will serve the same purpose. Step 8 is just to zoom out completely so you may see what you have just drawn.
I hope you learned something in this exercise and take a look at AutoCAD Exercise Day #2. Feel free to drop a comment below if you have any questions. Also, make sure to check out below the 100 CAD Exercises eBook; it comes with 50 2D and 50 3D exercises that you can use to practice!

[ws_table id=”3″]
Comments
10 responses to “20 Days of 2D AutoCAD exercises #1”
may I share this article for our reader in Indonesia? I’m planing rewrite these 20 days Autocad Basic training in Indonesian. thanks
Please contact in**@12***.com to discuss the details.
I did this three times and did not get the shape. I got a weird line –everytime! What did I do wrong?
So I type in “line” then it says specify first point, and I type in 5,0 and it looks like this with a padlock. This doesn’t look right to me. Is it supposed to have a padlock? Also, when I double check the coordinates of the point I just put down it is nowhere near “5,0.” What am I doing wrong?
To change the pointer input between absolute and relative coordinates:
-On the command line, enter DSETTINGS.
-In the Dynamic Settings dialog box, click the Dynamic Input tab.
-Under Pointer Input, click Settings.
-In the Pointer Input Settings dialog box, select either Relative Coordinates or Absolute Coordinates, as desired.
lol
I’m getting the same thing
coordinates provided are wrong
I got that like you too @@
Could you tell me how to fix that