
Tech fads are generally known for their ability to grab the attention of the public for a while before gradually dying out but from all indications, the design trend that involves additive manufacturing is definitely a design fad that isn’t set to go away anytime soon.
Due to the doors of possibilities it opens to anyone with a 3D printer and the materials needed for printing out realistic models.
The staying power of additive manufacturing can be seen in diverse industry verticals such as; engineering, bio-medicine, architecture, interior decoration, the toy manufacturing industry and even in fashion.

Its wide spread acceptance and use can be said to be due to various factors such as; the invention of affordable domestic 3D printers, the affordability of the needed design materials which can be gotten at any local utility store and the creative streak most humans possess.
But before you jump into taking advantage of the manufacturing freedom additive manufacturing provides, there are some basic information you need to know about this design trend as well as how to build your own domestic manufacturing workshop.
Therefore, this tutorial will provide the guidelines you will require to become conversant with the machines, tools and design processes that make up additive manufacturing.
3d printing for Beginners: Introduction to Additive Manufacturing
Although it took more than two decades for additive manufacturing to get the publicity it deserves, it is worth noting that additive manufacturing otherwise known as 3D printing is a manufacturing process that was brought to the public’s attention in 1984*.
The process known as 3D printing can be defined as the various procedures needed to build a three dimensional product using a 3D printing machine and a designed 3D character as the source of design.
The case for 3D printing was greatly enhanced by Chuck Hill, who invented the process known as stereo-lithography—which is the process of adding layers to a platform by curing photopolymer materials using UV rays—and the STL file format which is still the most widely accepted format that most 3D printing software applications recognize. Which gives Chuck Hill the probable tag as the master of 3D printing.
From the early 80’s to the new millennium, 3D printers were still in their developmental stage and only manufacturing industries and printing labs could boast of owning a printer due to their relatively large size and astronomical cost.
And like the personal computer, time and science proved friendly to the additive manufacturing industry which led to rapid advances in printing technology as well as the birth of today’s domestic 3D printers.
Building your Printing Kit
Now, the history of additive manufacturing is known, the next step for any prospective student interested in 3D printing is assembling his or her own tool kit to simplify both the pre and post-production process associated with designing and printing your own 3 dimensional models.
Below are the tools—categorized under pre and post production—every aspiring designer must have before taking on the task of manufacturing 3D models.
- Pre-Production Tools: the pre-production tools associated with additive manufacturing are the equipment you must have before starting the design process and these tools are;
- A 3D Printer: A farmer who goes to the farm without a hoe or tractor is definitely not looking to get any work done and so also is a designer without his or her printing machine. The 3D printer is the most important equipment you can have in your tools box and to pick the perfect printer that fits both your working space and budget. Please go through the review of domestic printers available here or check out the more comprehensive comparison of 3D printers.
- Thread Locking Fluid: On purchasing your 3D printer, the nest step to be encountered is assembling the machine according to the specifications included in its user manual but these manuals always omit the importance of a thread locking fluid to the long term use of your machine. 3D printing takes time and produces lots of friction and heat which affects the long term operability of your machine, so using a locking fluid—Loctite—keeps your machine functioning properly for longer periods. Always include a locking fluid in your printing kit.
- Computer Aided Design Software or 3D Scanners: Your 3D printer definitely needs a virtual prototype of the model to be built to serve as a road map for manufacturing and this virtual 3D prototype can be designed using two tools. A computer aided design software that gives you the freedom to design models to meet your particular specifications or a 3D scanner that can be used to scan three dimensional objects and reproduce a virtual prototype of the scanned object. The final product of both tools is the virtual model your 3D printer will work with.
- Post-Production Tools: these set of tools are the equipment every manufacturer needs to either finish or handle a 3D printed model that has gone through your 3D printer. Your kit should hold’
- Tweezers: simply imagine the heat that comes with drilling a hole into a metal feed and multiply this temperature by 20 and you will have an idea of the heat the 3D printing process exudes. Therefore to stay on the safe side when handling printing materials or feed, it is mandatory that you have a set of tweezers or pliers in your kit to handle both stray materials and newly designed components.
- Flush Cutters: during the printing process, the need to cut certain filaments that may disturb ongoing work will arise and to do this, the aid of a flush cutter must be courted. Therefore having one laying around your workspace is always beneficial.
The 3D Printing process
The process of bringing your creative ideas to life using additive manufacturing is one that occurs in different stages and before you can progress to either using your live models domestically or selling them to the public, you must first know the design stages to creating that model.
Here are the design stages:
Designing a Virtual Model—without a virtual 3D character or model for a 3D printer to copy, the printing process can definitely not occur which makes designing a 3D model the first printing phase. As stated earlier, the design of a 3D character can be done with the use of either a computer aided design software or a 3D scanner. And for this tutorial, computer aided design will be the design tool of choice due to the wide range of design possibilities it offers the user.
So, the first step is making use of a 3D CAD application such as Autodesk MAYA or 3Ds Max, which allows you design 3D characters in the modes and file formats most domestic 3D printers work with.
Understanding the Additive Manufacturing Process your Printer Employs—there are three basic types of manufacturing processes most 3D printers use in creating realistic models and a quick look at the user guide of the printer you purchase provides you with this information. There are 3 basic additive manufacturing processes and they are:
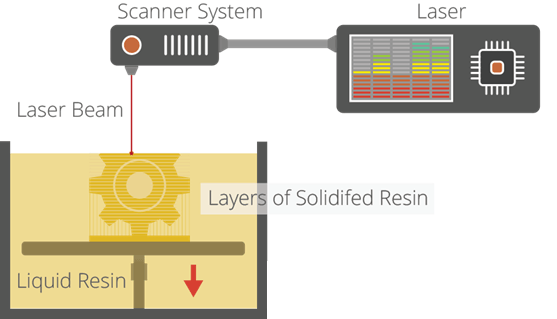
- Stereo lithography: the printing process called Stereo Lithography or SL is a laser based process that works with photopolymer resins or materials. It works by directing a laser beam that follows the X-Y axis across the resin’s surface and traces the dimensions provided by the initial 3D virtual model. Once the chosen pattern is completed, the resin sections touched by the laser becomes hard and drops down a bit thereby separating the actual design from the unused surfaces and your 3D printed model is done.
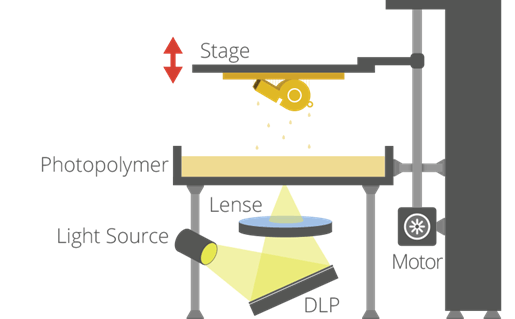
- Digital light processing: this process employs a design process similar to that of Stereo Lithography with the only difference been that instead of using a laser to trace out the dimensions of your virtual model, it makes use of an arc lamp.
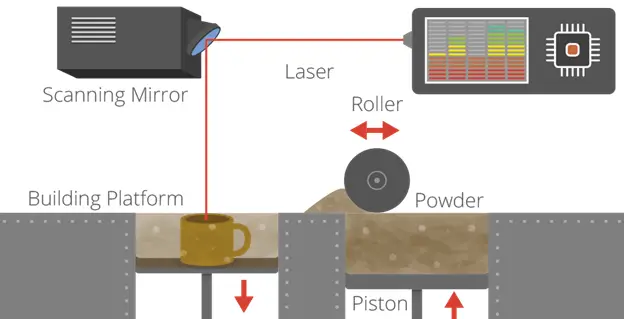
- Laser Sintering/Laser Melting: this is a 3D printing process that makes use of a design laser and powdered substances as the design material. The Laser sintering process works when the laser, tracing out the dimensions of your virtual model, draws a pattern on the powdered material which makes the powdered materials fuse into a solid pattern drawn by the laser. This method is quite beneficial in today’s design society for it can be used to create both plastic and metal models.
Selecting your Design Material or Machine Feed—the next step is choosing the materials that work with both your design and 3D printer. This is because most domestic printers come with set design capabilities as well as material types they can work with and once you get that right you are good to go.
Printing Your Designed Model—next comes the actual printing of your virtual model. To do this, you need to have certain tools to ease the process and they are:
- A software that reads your CAD file for the chosen printer; most 3D printers provide pointers on the software to use in their user guides
- The right material
Once all the needed materials are available, simply feed the 3D model to the intermediary software which in turn translates the design to the 3D printer. Once it is ascertained that your printer has read the file, hit the start or design button and the 3D printer starts itself and proceeds to following the imputed information.
- Post manufacturing—on completing its set task, the 3D printer stops working and the printed components or models can then be extracted using the post processing tools outlined in previous sections. The need to shape some certain aspects of your model may also come up and this can easily be done with the help of filing tools depending on the nature of material used.
The Benefits of 3D Printing
3D printing has been termed as a ‘disruptive technology’ due to several reasons such as the printing of a working gun in the US which raised fears of terrorist groups or disgruntled teenagers printing weapons in the comfort of their homes and unleashing them on an unsuspecting public but in retrospect, the benefits out weight the negativity surrounding additive manufacturing.
It is a well-known fact that 3D printing simplifies the manufacturing of goods by reducing both manufacturing time and the cost incurred in hiring employees to handle certain manufacturing phases but the benefits of additive manufacturing goes a bit further than these.
Bio-Medical Benefits: additive manufacturing has enhanced health care and the medical field as more and more individuals use the power of computer aided design to create unique medical devices—prosthetic hands, legs etc.—and then manufacture them right at the comfort of their homes for public use.
Customization: 3D printing has given graphic designers, gamers and toy manufacturers a new and simpler method of manufacturing customized items to meet their aesthetic needs or that of their customers.
With the right design software and a 3D printer, one can easily design customized items to fit into his or her home.
Environmentally Friendly: as more and more factories embrace the additive manufacturing phenomenon, brick and mortar manufacturing establishments which are notorious for the amount of smoke and bio-hazardous materials they spew would become a thing of the past and the number of factory injuries that labor experiences year round during manufacturing will also be drastically reduced by the introduction of 3D printing.
Comments
One response to “3d printing for Beginners – Additive Manufacturing”
[…] printing also known as additive manufacturing has also been labeled as a disruptive technology due to the fact that every Tom, Dick and Harry can […]